
By Mark Harlow
National award-winning nature & wildlife photographer
The Brainerd Lakes Area is the perfect place for your next Dark Skies Experience! From the Milky Way to the Northern Lights, the views here are awe-inspiring. Get expert tips from Mark Harlow on how to maximize your adventure.
National award-winning nature & wildlife photographer
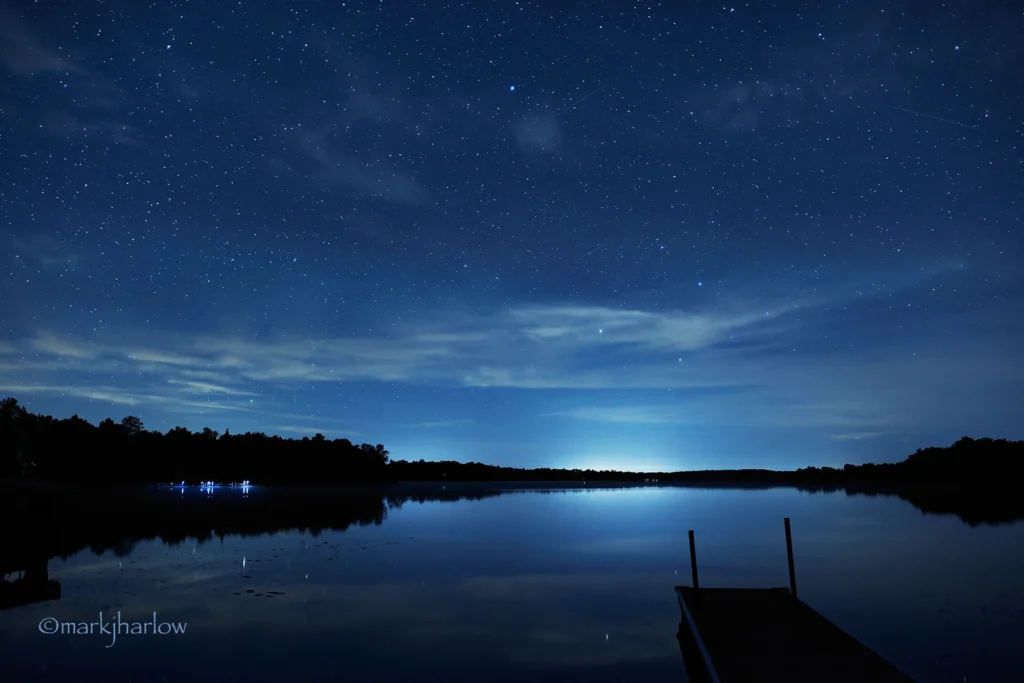
Welcome to our new Blog. It is family friendly, insightful and educational. We hope that you will enjoy a unique look into our beautiful night skies. All imagery was taken in the Lakes area by our local and National Award Winning nature photographer Mark J Harlow. Mark will offer you a unique look into our Night Skies and the Universe.
By Mark Harlow
A night sky experience can range from a casual look up, to a well thought out and planned event. The magic of a clear dark night sky, can be one of those experiences you can cherish forever. Please check out our UNIVERSal Knowledge Center section further down, for more information.
What is the purpose of this Blog? It is a fun and casual introduction to our night skies.
What it is not? This will not be an in-depth, highly technical resource. All visitors can certainly deep dive more information on their own for topics or images that interest their curiosity. This is a new venture for us as well. If the interest is there, we may add more images and information including interviews with Mark at a later date. Please let us know what you think.
Thank you for checking out our new “The Night Skies Experience” Blog.


Welcome to the UNIVERSal Knowledge Center. Learn – Explore – Discover…
The goal of this blog is to help you learn, explore and discover our incredible night skies.
We have consolidated a lot of great information and common sense items to think about and prepare you for your Night Skies Experience. At the end will be a checklist of items you may want, to make sure your adventure is the best it can possibly be. The night sky is out there for all to see and enjoy. Our goal is to have more people see, experience and appreciate our night skies. Our goal to raise public awareness to light pollution. Just as we cherish and protect the wilderness, we need to cherish and protect what is left of really dark skies. We need to protect what we have and improve on what already exists.
Nighttime has a way to make even the simple tasks just a little more difficult, but should in no way deter your enthusiasm. Let’s talk about the things you will need to think about and things that can be a huge help while out enjoying the night skies.
Weather is the first wild card we have to deal with. Finding the darkest areas where you are staying is another. Be aware of the current moon phase, moonrise and moon set times. Weather and upper atmospheric conditions are something we can’t control. Becoming aware of the weather short and long term is well advised. Use your favorite weather, stargazing and Aurora Apps to really zero in on the optimal nights. See the checklist at the end. Having small luxuries and necessities will make things more enjoyable, especially for the kids if you have them. It is important to get the youngsters involved with seeing the Universe and all its wonder.
Lets get into each category of the three night skies experience categories…
Stargazing and the Milky Way…
General stargazing and Milky Way viewing can be broke into two categories. Naked Eye or Visually aided.
PRO TIP: Try to really acclimate your eyes for night vision. Get your viewing environment set and all lights turned off. Close your eyes for at least one minute to dilate your pupils. This will aid in seeing dimmer targets and regions of the night sky.
Have a great App like this writers favorite… SkyView. It can really be fun to use and speed up the learning curve on what is up there in our night skies. Simply point your cell phone at a star or target area and the App will tell you what it is! You can also have fun in pointing downward, looking through the Earth to see what is not yet above the horizon. I strongly advise searching and watching a few YouTube videos on the App set up, tips and tricks, depending on your camera make and model ahead of time before your go. Settle in at your dark location and enjoy the views.
Although you can enjoy our beautiful night skies year around, one of my personal favorite things to see is the Milky Way (during the peak months of June-July-August). Patience will be needed to see it in all its glory. Once you get past the 3-stages of twilight (which seems to take forever when looking to the NW), you will finally achieve total darkness. 90-120 minutes after official sunset is a good starting point for total and official darkness (give or take).
It’s almost like the Universe says…”Want to see the incredible Milky Way? Not so fast. You will be teased with slow appearing stars and planets first”. Total and official darkness happens usually around midnight (give or take, depending on your location). I assure you, the wait and sacrifice will be worth it. You will then want to position yourself to look towards the E-SE-S skies to see the core of the Milky way (depending on which month and what time of night it is) and all the amazing stars in the spiral arm (as shown in some images).
The classic dark horseshoe area of the Milky Way will be 10-30 degrees above the horizon (depending on time of night or month). It lays diagonally with the “shoe” open to the right. To the left of the bottom horseshoe a little ways, you will see a pinkish set of two eyeballs. That is the Lagoon Nebula (located in the Sagittarius region). Visible with naked eye, it is better viewed with binoculars, spotting scope or telescope. As the night progresses, the Earth will rotate to the east (left) and the Milky Way will rotate to the West (right), with the dark horse shoe region diving towards the horizon and eventually disappearing.
Total darkness is only available for less than 4-hours during the Summer Solstice time frame (June 20th 2025).
When taking your stargazing to the next level viewing wise, having a great pair of binoculars (not too powerful though if hand holding, nothing over 10X power) spotting scope or portable telescope can really help you zero in on those smaller targets. If you get optics that are too powerful, you will need a tripod with a ball head and mounting plate to mount your optics. If you have a really powerful spotting scope or telescope, you may want to invest in a portable tracking mount/tripod combo. This will be beneficial in not having to readjust the optic device constantly. It will track at the Earth’s speed of rotation and make viewing much more enjoyable! Level your mount’s tripod, then make sure to do a proper polar alignment on the mount to help the mount track flawlessly.
Next up, let’s prepare for the Northern Lights – Aurora Borealis…
This writer took his first successful Aurora picture in 1981 in the BWCA with film and has been a humble admirer ever since. Technology has increased your odds to not only see but photograph the incredible Northern Lights, also know as the Aurora Borealis.
What causes the Northern Lights?…
These magnificent events happen when a solar mass ejection of plasma and particles slam into the Earth’s atmosphere and its magnetic poles at speeds up to 45 million miles per hour!. The two main elements of oxygen and nitrogen in the Earth’s atmosphere will actually illuminate and give off different colors. Oxygen will generally create the greens which are most common, plus some of the reds found higher up from the horizon. Nitrogen creates the purples, blues and pinks reds and various color shades in between.
In addition to your important weather Apps, a great Aurora app is also essential in forecasting when the Northern Lights activity will be at their most active (up to two weeks out). My personal favorite is Aurora Forecast. Aurora Forecast has nicer graphics, a more natural user interface and Live View. Watch a few YouTube videos on how to set up each App according to your phone make and model ahead of time, before you venture out.
Please keep in mind these Apps are no where near 100% accurate. I’ve had many non event nights when they were supposed to be going. I’ve also seen and photographed them when there was no activity forecasted. I’d say they are 60-70% accurate overall, but still nearly impossible to predict. Be prepared for not seeing them, it happens.
Naked eye viewing vs Photography. Why do the Northern Lights look different compared to photos?…
Naked eye, real time viewing and photography are not the same thing.
Newcomers to Northern Light chasing sometimes have too high of expectations of what they will see…when it comes to the ease of seeing the Northern Lights. There are many times when the solar activity is mild to non existent. Most of us are conditioned to seeing photographed images on the news or social media with insane colors and patterns. Most of the time, those images have been exaggerated by over editing (too much saturation, contrast etc). There are times however, when the Northern Lights are hard to believe on their own without photographing.
With naked eye viewing, the human brain is the biggest culprit to not seeing images like you might see on Social Media or on your camera. The easiest way to have this statement sink in is to remember… naked eye viewing wipes away your view (up to 30-60 times per second). Cell phone cameras, DSLR or mirrorless cameras COLLECT AND BUILD light intensity and values. In addition, most cameras can also see a wider color spectrum than our own eyes. The human eye can only see a small portion of the entire light spectrum (400-700nm).
When naked eye viewing, try to locate the darkest skies you can, either where you may be staying or nearby. Also use topography to your advantage. Be mindful of your light pollution sources. Use the land or trees to help shield those sources. Light pollution from cities, or road lights, billboards etc can all hinder your viewing pleasure. You will want to be looking to the Northeast, North and Northwest.
Once you get settled in, I like to turn off all of your light sources, then close your eyes for 30-60 seconds. Slowly open them and start to the looking to the Northeast. Try to not rapidly look back and forth. Start by picking a distant tree, or something on the horizon, and don’t move. Stay in that position for 30-seconds then move west (left) pause and repeat. By slowing down and staring at the horizon each time, this will help you detect any subtle light movement or fluctuations from the horizon upward.
Some nights, you will not really see any color, just a whiteish or light green tint to the source. I like to start at the East because in most cases, the Northern Lights will travel from right to left (E to W). Only during major light storms have I seen them backtrack to the East. Patience and persistence will pay off.
TIP: Ahead of time, search online how to take night photos with your cell phone (if your phone is capable), including “tips & tricks”. Consider a tripod with a cell phone holder and ball head, to level up quicker vs just a tripod and constantly adjusting. Lastly, use a timer on your camera to insure the steadiest possible end result.
If you are having a hard time seeing the Northern Lights, try using your cell phone camera. Use your camera’s timer. Try sitting or lean against a tree, or solid structure if standing. This will help you steady the camera while the exposure is underway. You may be surprised to see there actually are Northern Lights going! Again, our brains hinder our ability to collect light values and color like a cell phone or other cameras can.
What I love about the Northern Lights is all of their various colors and intensities.
Their colors can range from dark deep red, to intense red, purples, pinks, yellows, orange, light pale green to even more intense greens (as seen in the slide show). On the rarest nights, they can actually go 360 degrees, forming an Apex circle straight overhead!
We are at the peak of an 11-year cycle. 2025 and beyond should still be very active years. This 11-year solar cycle has been documented for over 200 years. Even on the slowest years of solar activity, the Aurora’s can still be found.
People often ask me…“What months are the best”? or “What time do the Northern Lights get going?” To be honest, I’ve photographed them in every month of the year, with the coldest outing being minus 37 degrees actual air temp. As far as what time? It depends on the approaching solar activity for any given night. I’ve photographed them as early as just before dark, with twilight still present, all the way to pre dawn. I’ve also photographed them during a full moon, which takes a very powerful event to overpower the moonlight and be visible against the moon washed dark sky.
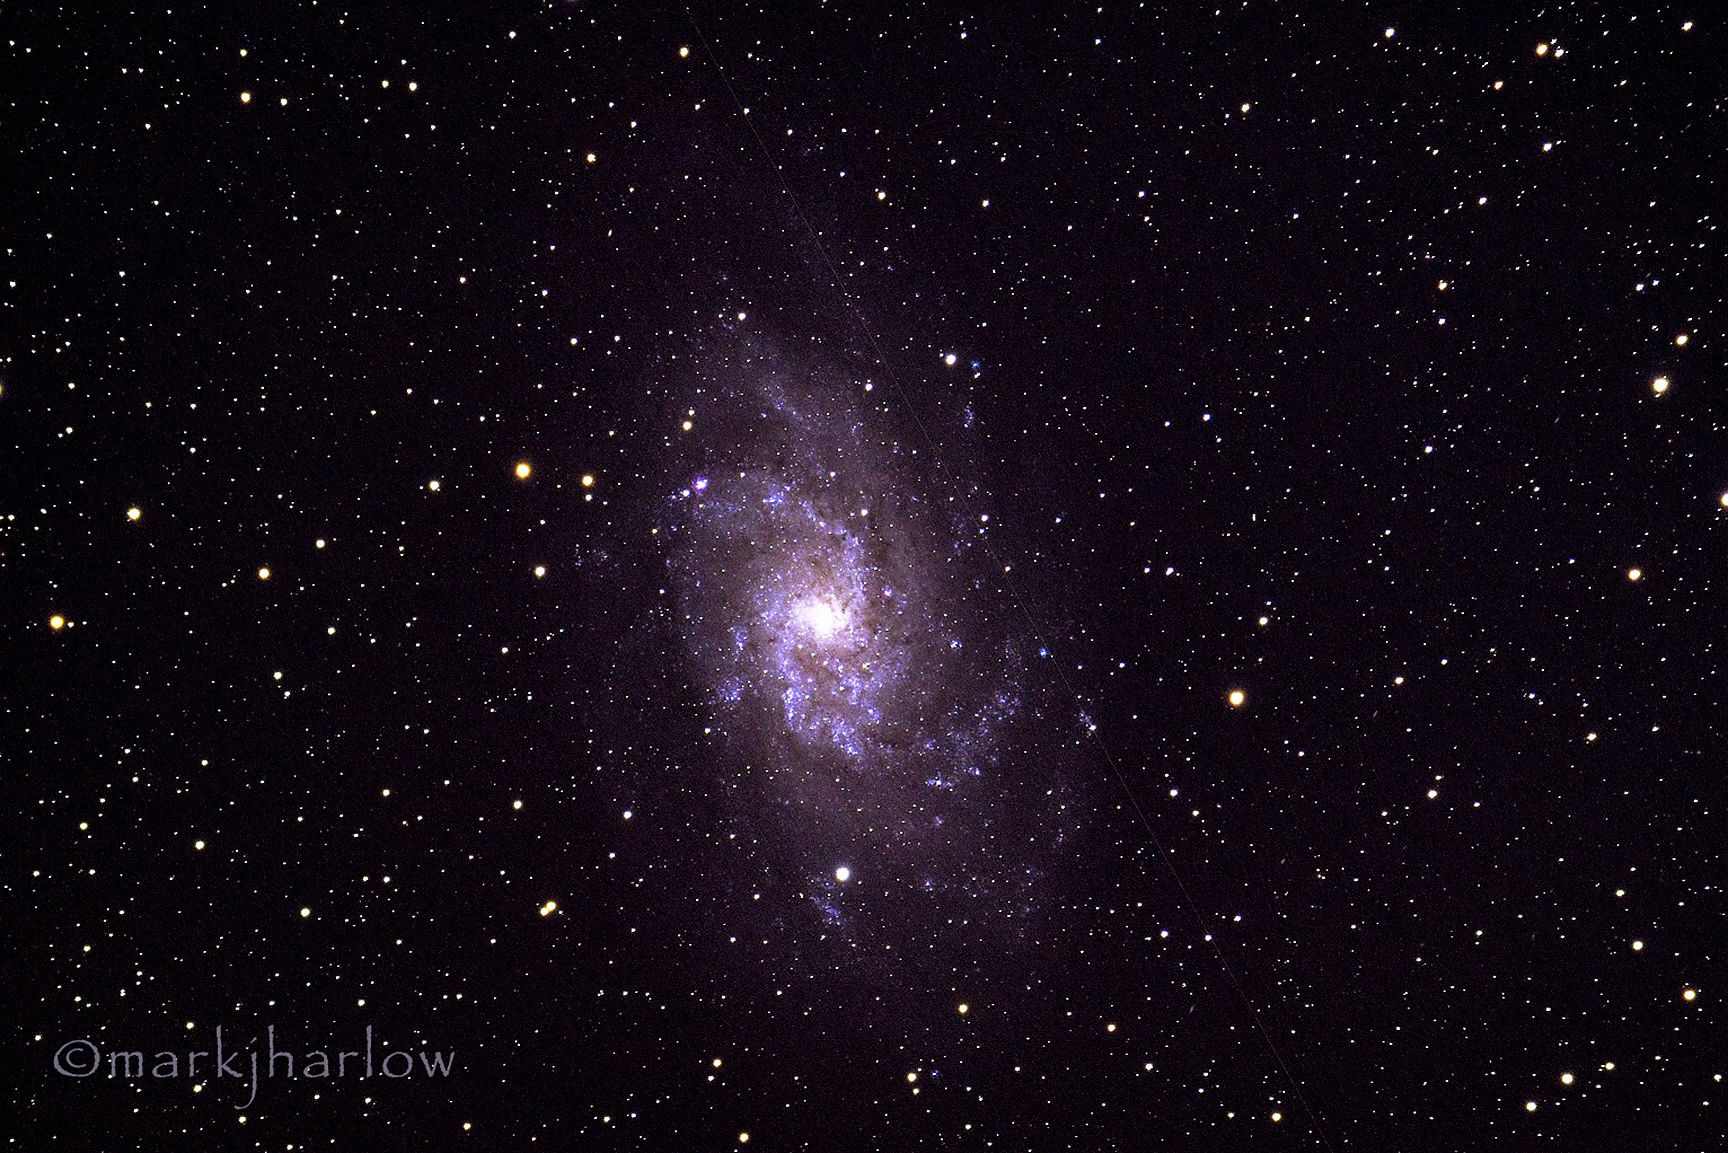
Let’s go over our last category…Deep Space & the Universe…“It is a place where elegance meets sophistication.”
Deep Space Viewing – Imaging, Credits and Closing Comments…
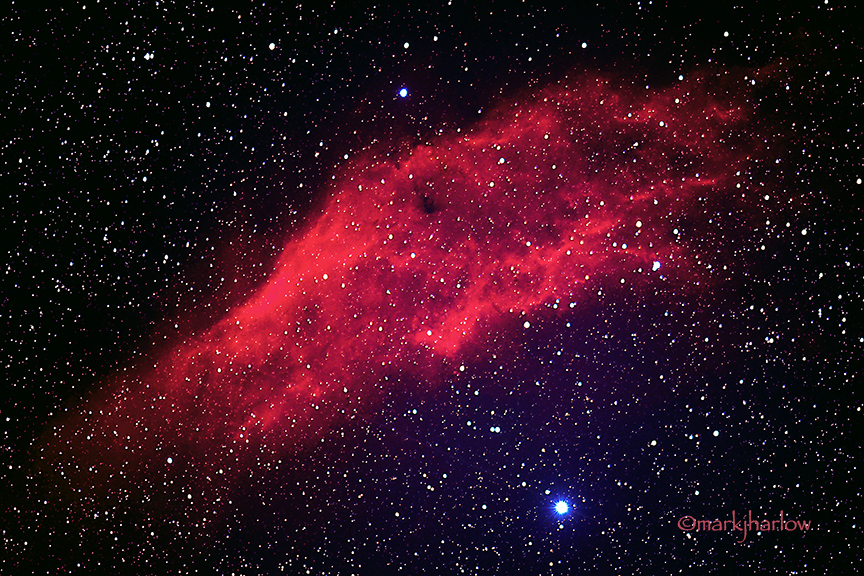
“Strap on your seat belts” when it comes to learning. Deep Space and the Universe is an amazing, complex and diverse topic. It is a place where size, distance, age, time, power, speed and physics are hard to wrap our brains around. Distance and size is measured in light years, size can also be measured in solar masses. The power of objects like black holes, super nova’s, quasars, and pulsars, push physics well beyond their limits and well beyond our comprehension. Most deep space objects send data points soaring off the charts. It is a place where elegance meets sophistication. How can anyone be bored with all of the things in space that help make up our Universe?
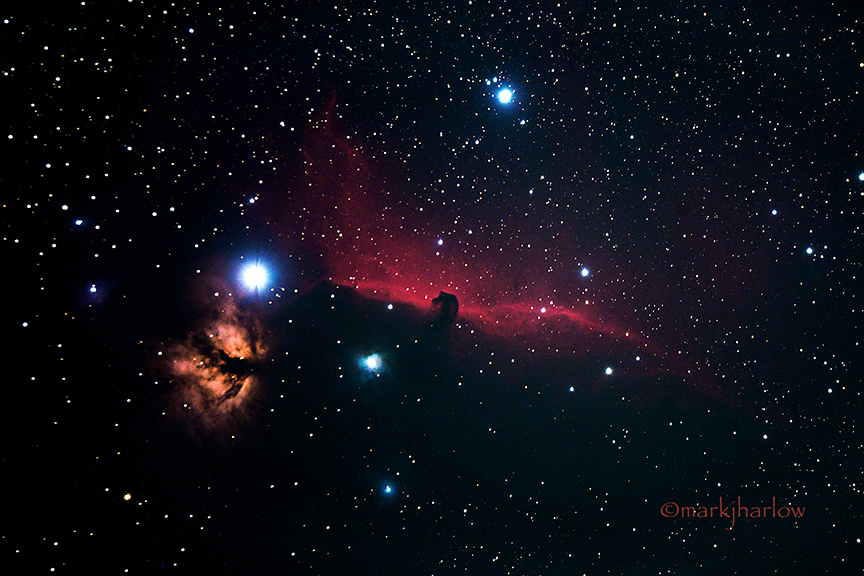
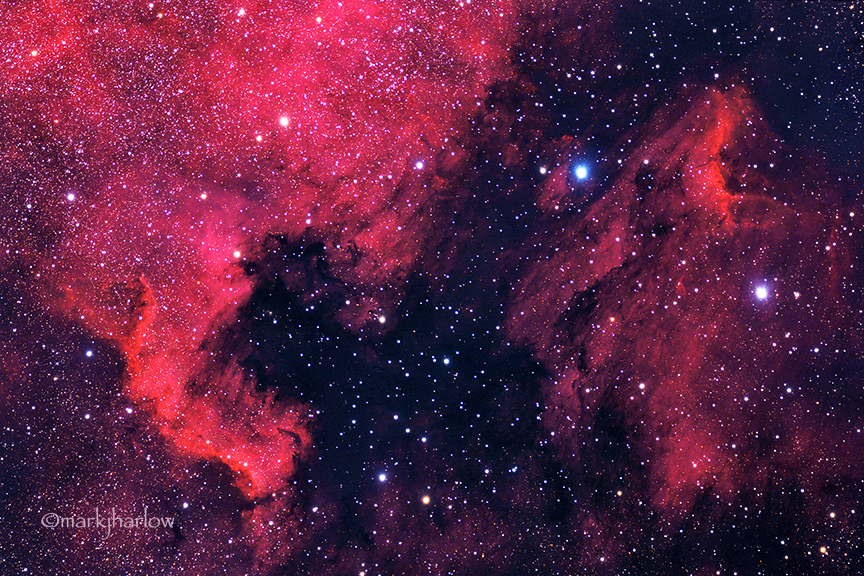
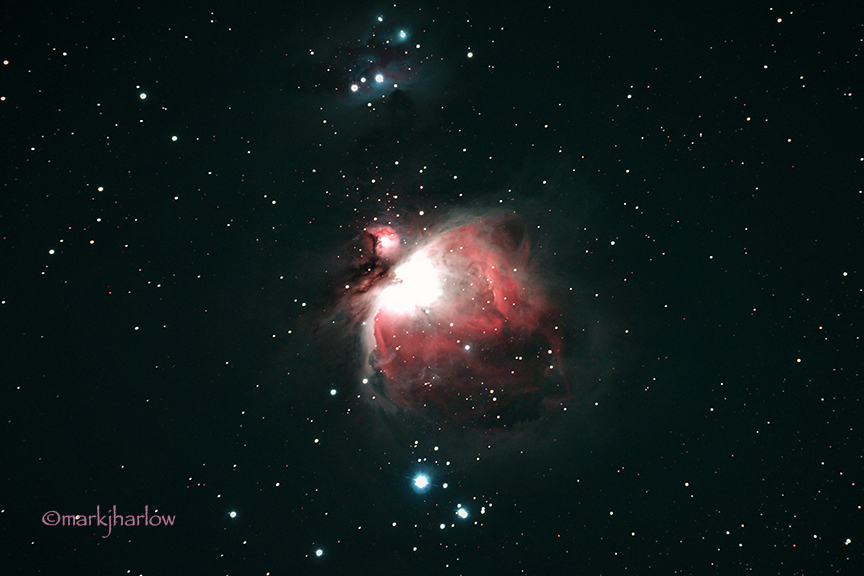
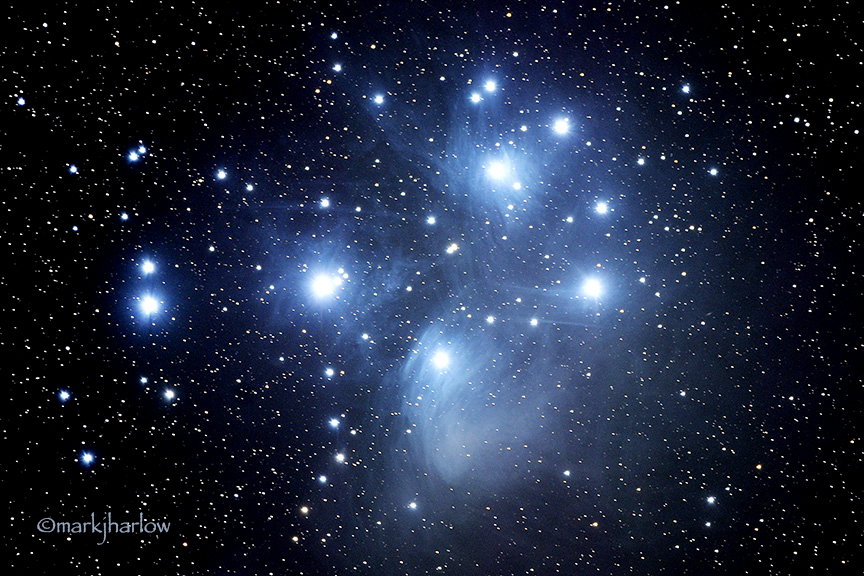
The equipment, tools and software needed to do the most advanced Deep Space image capturing can be quite overwhelming. For the time being, we will not be covering this topic in advanced detail on this blog. Enjoy the images shown in the slideshow. All images were taken right here in Lakes Country.
I’d like to do a shout out to my friend, mentor and observatory partner James Wentworth. Jim is a former Astronomy instructor who I met back in the late 80’s and one of the sharpest people I have ever met. We talked at length back then about night imaging with film, telescopes and equipment needed to do so. I tracked down Jim in 2017 and we picked up right were we left off. We have been imaging together ever since. It seems a perfect match was formed. I’ve spent over four decades (professionally) in the high end imaging and Fine Art industries and Jim has spent over seven decades of his life viewing and learning the Universe.
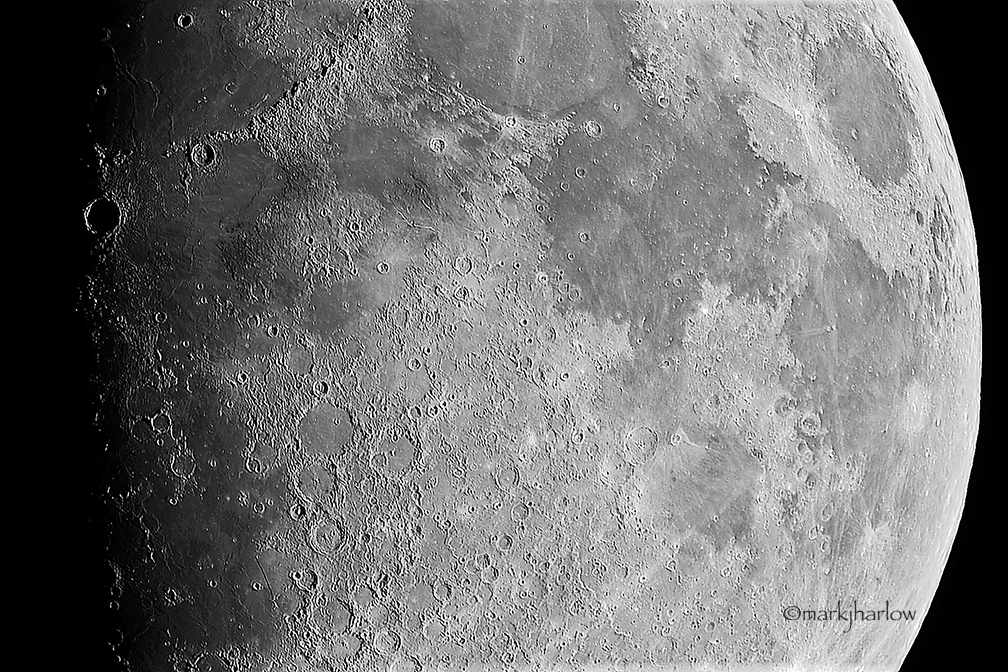
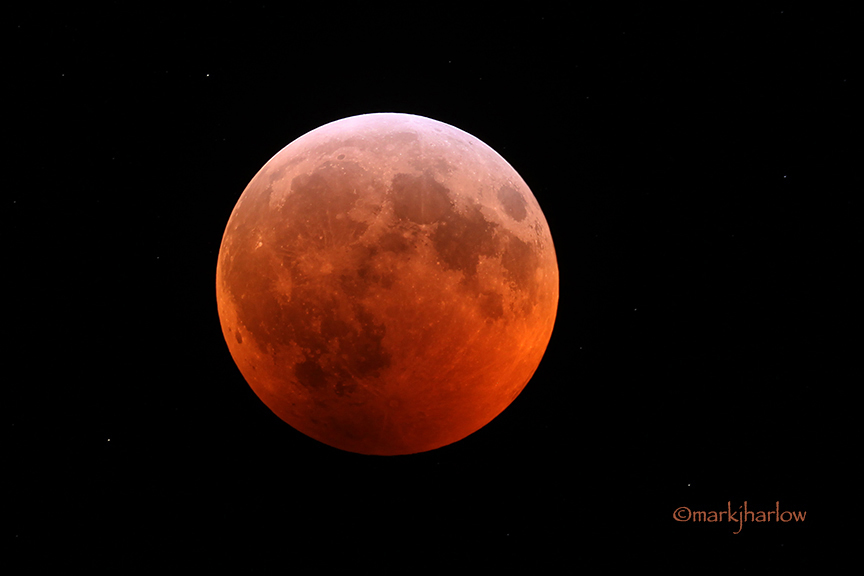
We have imaged difficult and distant galaxies, nebula’s, star clusters, comets, supernova remnants and more since reuniting. Lunar imaging is also something we do when the perfect conditions allow. With all due respect, Lunar imaging is easier to do, when compared to some of the most difficult and dimmest deep space objects. Of all the imaging I’ve done, Deep Space imaging is by far the most difficult and demanding of all night imaging categories. It is the most demanding (equipment & technique wise) on optics, telescopes, mounts, camera equipment, and image processing.
Limited funds are the only thing holding us back from achieving even greater image results, as we are imaging with decades old optics and tracking mount. Light pollution continues to be a thorn in our side and is steadily getting worse. More on that topic at a later date.
Space and the Universe can be a lifelong learning experience. It can be a simple or complex as you’d like to make it. If you are bored with life, please look into learning about our Solar System, Deep Space and the Universe.
ADVANCED LEARNING INFORMATION…
Waiting for TOTAL DARKNESS…
What technically is TOTAL DARKNESS?
Total and official darkness seems to take forever during the summer months. Summer is great when it comes to the long hours of daylight. On the other hand, it is challenging if you have a hard time staying awake past 10pm and want to see the night skies. I suggest you pick your nights carefully weather and conditions wise, so you can take a nap earlier in the day to stay awake for the night skies experience. In most cases it will be worth the sacrifice.
If traveling to a dark area, don’t get there too early (during summer). The problem with going just past sundown is that the mosquitos and bugs are very active. Wait for an hour past sundown, the mosquitos & bugs will eventually calm down. Seeing fireflies, hearing the sounds of crickets, frogs, loons calling, owls hooting, coyotes yipping and occasional wolves howling can all add to your memories. Enjoy and cherish our Night Skies. Make new memories. Pass on to your family, a new appreciation for the Night Skies and the Universe.
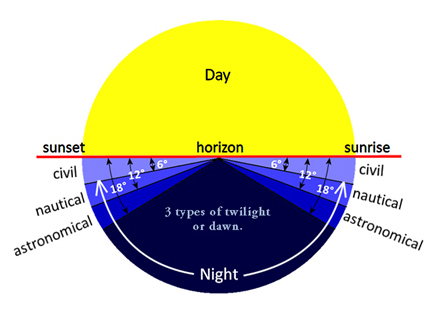
TOTAL DARKNESS CHART:
Total darkness is only available for less than 4-hours during the peak of summer.
Once you get past the 3-stages of twilight, total darkness is finally achieved (90-120 minutes after official sunset).
The first of 3-stages of dawn will then begin as early as 3:40am when the night skies slowly getting lighter and brighter.
Illustration Credit: National Weather Service
What is a Bortle Rated Dark Sky? – Finding the Darkest Skies…
What are Bortle Skies? John Bortle came up with a light pollution scale in 2001 and it that information was published in Sky & Telescope Magazine. A great resource for beginners and advanced astronomers as well.
The Bortle scale ranges from 1-9. 1 being the darkest skies possible, void of light pollution altogether, to a 9 which would be inner city at night. To see the Milky Way, Constellations, Planets, with excellent results, a Bortle Sky rating of 4 or lower is ideal. As someone who has photographed some of the darkest skies our state has to offer, I can tell you…there are plenty of great micro locations for Stargazing and Aurora Viewing right here in Lakes Country.
Apps like ClearDarkSky, DarkSiteFinder and Go-Astronomy.com for satellite views are a great place to start for finding the darkest skies in your area. If you don’t have the desire to travel from where you are staying, small things like turning off your outdoor lights and indoor lights will help greatly. Make sure you have a flashlight and preferably a head lamp (red lamp option is best) for hands free use.
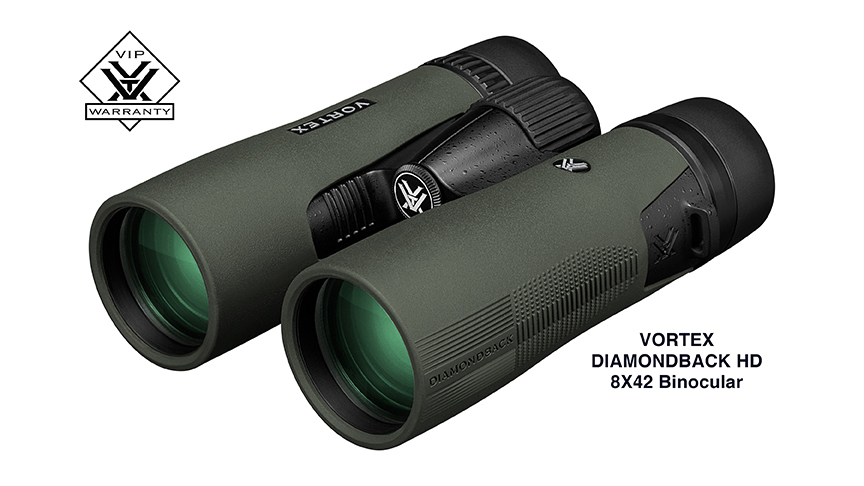
OPTICS PRO TIPS:
When it comes to optics for your night sky viewing, you get what you pay for in most cases. I have been a big fan of Vortex Optics for many years and own their equipment. They offer incredible value for the dollar…rugged quality, performance and the best Lifetime Warranty in the business. Featured here are the Diamondback HD 8X42 Binocular and the angled Viper HD 15-45x65mm spotting scope. The angled model offers convenience for multi viewers of different heights. The Diamondback HD binocular offers tremendous optical performance with the perfect power for hand holding. The Viper HD spotting scope offers the best of both worlds, incredible performance and rugged durability. A quick shout out to Vortex Optics for providing these two models for review.

When it comes to telescopes, there are many portable options available. Please research further to see which brand and model of telescope best fit your needs.
Use this checklist to make your adventure the most enjoyable:
A little planning can go a long way to ensuring your efforts are rewarded. There are many micro areas in the Brainerd Lakes area that offer superb night skies. Utilize topography to your advantage. Trees, hills and lack of lights can help immensely.
Weather Apps and more specifically, atmospheric Apps like Sky Live or Astrospheric (more advanced and complex but excellent) can give you an accurate report of what the skies will be like for the best viewing. Search out Light Pollution Maps & Apps, then select which ones you like best.
A little preparation can go a long way ensure a comfortable and safe night outing. These are some of the items you will need for casual Stargazing, Aurora or Deep Space viewing. Search out “What’s in the sky tonight” or “What’s in the sky this month” ahead of time. Apps like Sky Live will also show you in real time which planets, stars, even the ISS space station and Moon will rise, appear and set. Very handy to have in the field.
Lastly, sit back or lay down and enjoy the show, tranquility and serenity. Odds are you will see a shooting star if you stay long enough. I usually see several on any given night. If you happen upon another group of Stargazers or photographers, please respect their location and darkness. Turn off your headlights as quickly as possible (when safe to do so). If they come over to chat, great. If not, please respect their privacy.
There you have it! Many years of experience and outings went into offering this information first hand. Hopefully you learned something along the way and are more interested and excited about experiencing our night skies. Thank you for reading,
Sincerely, Mark Harlow
harlownature.com


Sign up to receive information on events, activities, and deals from the Brainerd Lakes Area.
Proud partner of the Brainerd Lakes, Crosslake, and Pequot Lakes Chambers of Commerce.